In this article, we will explore a delicious and easy-to-prepare recipe.
Indulgent Red Velvet Cake Bites: A Delightful Treat for Every Occasion
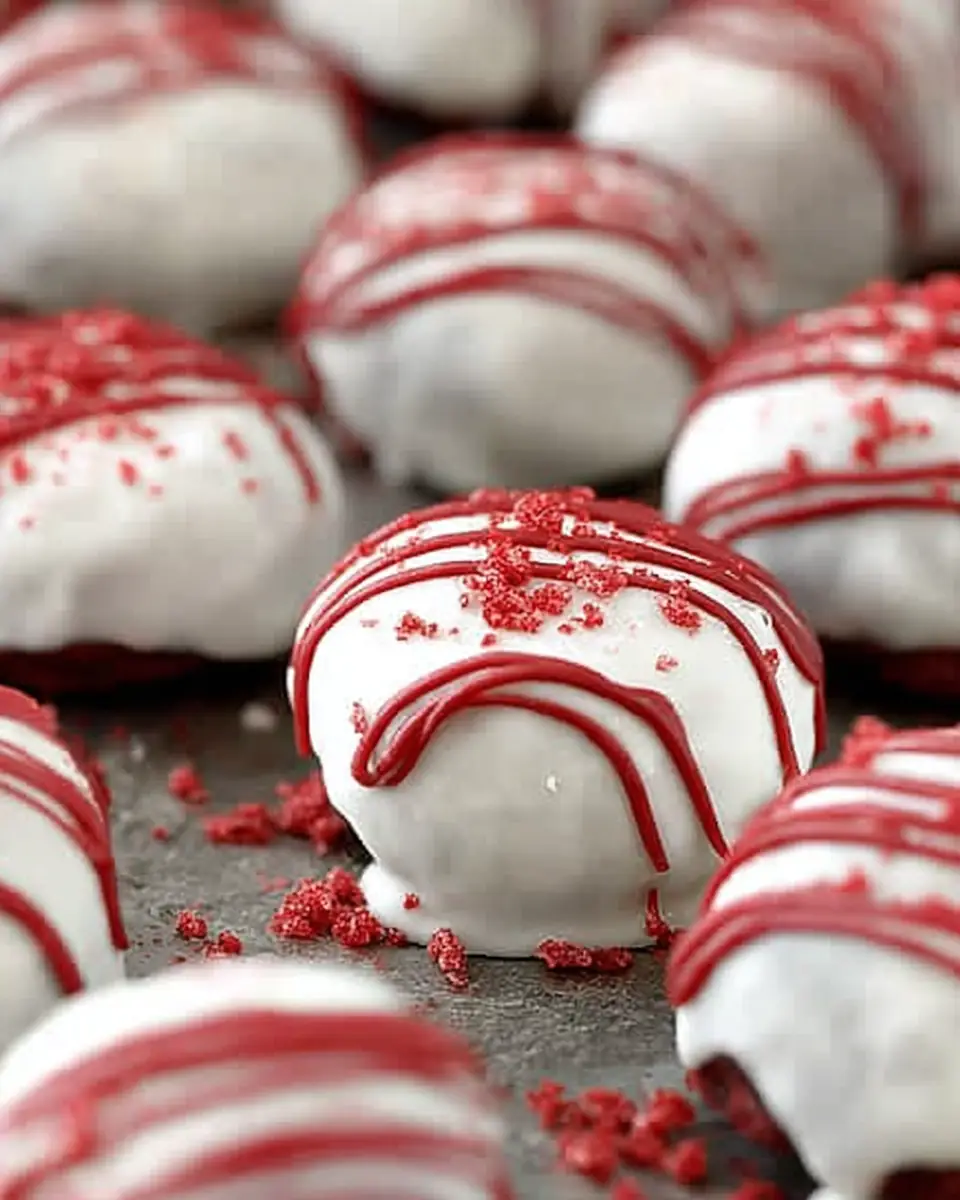
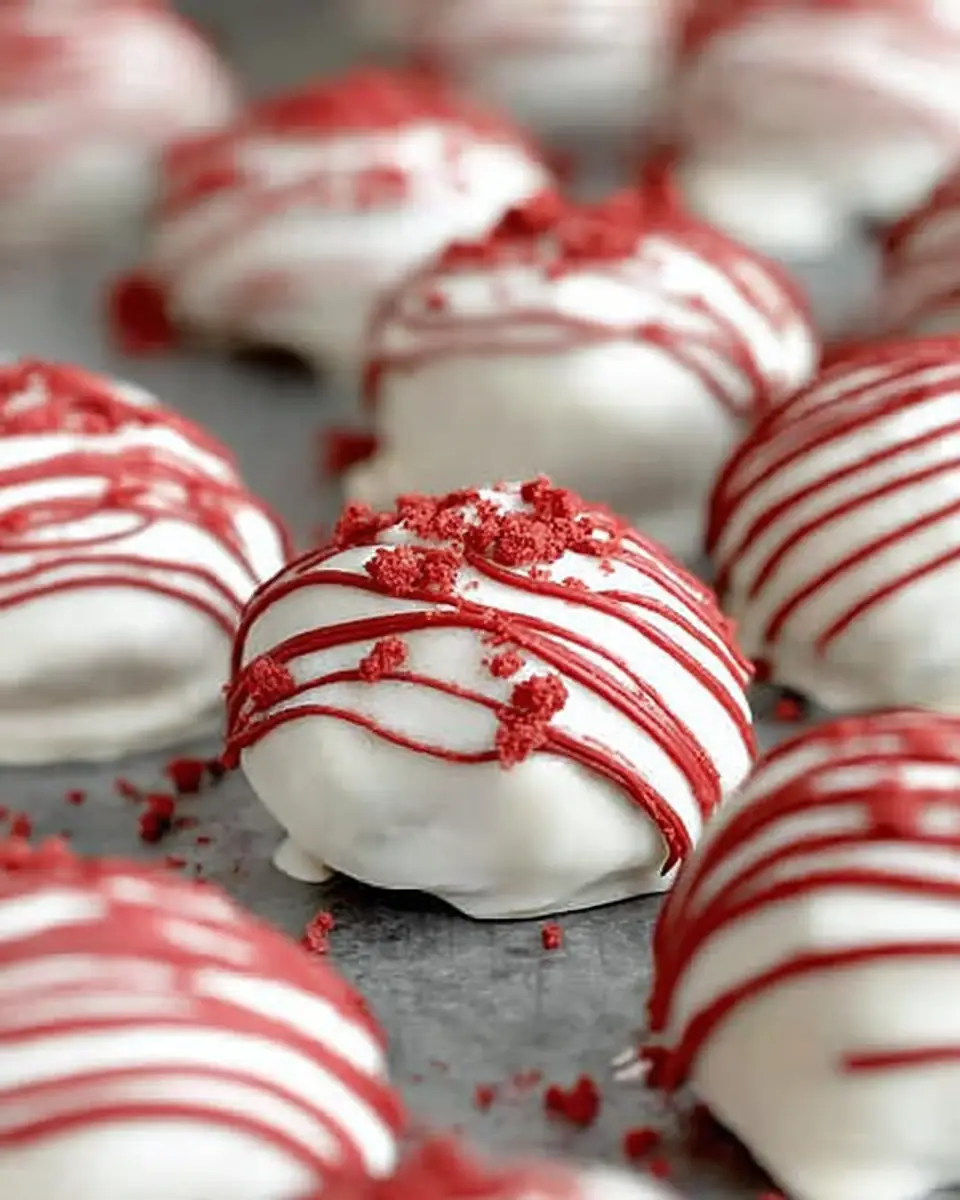
If you’re a fan of red velvet cake but are looking for a more bite-sized indulgence, then these Red Velvet Cake Bites are the perfect match for you. These decadent bites encapsulate all the moist, rich flavors of a traditional red velvet cake, wrapped in a luscious white chocolate coating. Whether you’re planning a party, a cozy gathering, or simply a treat for yourself, these cake bites are sure to impress.
Ingredients You’ll Need
For the Cake Bites: – 15.25 ounces Red Velvet Cake Mix (1 box) – 1 ¼ cups water (as listed on cake box) – 3 eggs (as listed on cake box) – ½ cup vegetable oil (as listed on cake box) – 16 ounces cream cheese frosting (1 package or homemade)
For the Coating and Decoration: – 1 pound white chocolate candy coating or almond bark – 15 Red Candy Melts (optional, for decorative red stripes)
Step-by-Step Instructions
Step 1: Bake the Cake
Start by preparing the red velvet cake according to the directions on the package. This typically involves mixing the cake mix with water, eggs, and vegetable oil. Once combined, bake the cake as instructed.
Step 2: Cool and Crumble
Allow the cake to cool completely. For those in a hurry, placing the cake in the freezer for about 45 minutes is a great way to speed up the cooling process. Alternatively, let it cool overnight on the countertop.
Once cooled, place the cake in a large bowl and crumble it using your hands. Aim for a fine, uniform texture to ensure the best consistency in your cake bites.
Step 3: Combine with Frosting
Gradually incorporate the cream cheese frosting into the crumbled cake. Add about ½ cup of frosting at a time, mixing well after each addition. The goal is to achieve a consistency that holds together when rolled into a ball.
Step 4: Form the Cake Bites
Using your hands, roll the cake and frosting mixture into small balls. Consider the richness of the bites and opt for smaller sizes for easier handling and eating. For a more professional look, flatten them slightly to create a disc shape. Arrange them on a large baking sheet and refrigerate for about 30 minutes to set.
Step 5: Coat with White Chocolate
Melt the white chocolate candy coating following the package instructions. Using a skewer or similar tool, dip each cake ball into the melted chocolate, ensuring an even coating by rotating as needed. Place each coated bite back onto the baking sheet or wax paper.
Step 6: Set and Decorate
Allow the cake bites to set. For quicker results, refrigerate them until the coating hardens. If you plan to add sprinkles, do so before the candy coating hardens. For an elegant touch, melt the red candy melts and drizzle them over the set cake bites. Simply place the melted candy into a resealable bag, snip a small corner, and drizzle over the bites.
Enjoy Your Sweet Creations!
These Red Velvet Cake Bites are not only delicious but also visually appealing, making them the perfect addition to any dessert table. They offer a delightful balance of moist cake, creamy frosting, and a smooth chocolate coating.
Nutrition Information (Per Serving)
- Calories: 150 kcal
- Carbohydrates: 19 g
- Protein: 1 g
- Fat: 8 g
- Saturated Fat: 5 g
- Trans Fat: 1 g
- Cholesterol: 10 mg
- Sodium: 95 mg
- Fiber: 1 g
- Sugar: 16 g
Total Time
- Prep Time: 2 hours
- Cook Time: 30 minutes
- Total Time: 2 hours 30 minutes
These cake bites are a testament to the joy of baking and sharing delicious treats. Whether you’re a seasoned baker or a novice, these Red Velvet Cake Bites are sure to become a favorite in your baking repertoire. Enjoy every bite!
Red Velvet Cake Bites
Ingredients
Equipment
Method
- Bake the cake according to directions on the package.
- Let it cool completely (I put mine in the freezer for about 45 minutes to cool it down really fast . . . but you could also let it cool overnight).
- Put the entire cake in a bowl and crumble it up. I found that it was easiest to just use my hands to completely crumble the cake.
- Stir in your container of frosting into the crumbled cake (or homemade, if you choose to use that), about ½ cup at a time. Once it reaches a nice consistency that will hold together when you roll it in a ball, it’s perfect.
- Roll the mashed cake and frosting into balls. You can go as big or as small as you’d like, but keep in mind that these little bites are rich, so most people prefer smaller. If you want them to look more like authentic cake bites, smoosh them down so that they are shape of a disc (not so rounded-out like a ball). Place bites on a large baking sheet (like a cookie sheet) and place them into the fridge for about 30 minutes to set up.
- Melt white chocolate candy coating according to directions on back of package. I then used a skewer to dip each ball- I would poke it into the cake ball and dip it into the melted bark. I had to rotate each bite a couple of times to make sure it was evenly covered with chocolate.
- Stick the cake bite back onto the pan or onto wax paper.
- Let the bites set up. I stuck them back into the fridge because I wanted them to harden quickly, but you could leave them out and they will be just fine. If you are going to decorate them with sprinkles, make sure to do it before the candy coating hardens. If you are going to drizzle with red candy melts, it works best if the cake bite coating has completely set up.
- To drizzle the candy melts on top, melt candy according to package directions.
- Spoon melted candy into a resealable sandwich bag.
- Clip a TINY corner on the bag and drizzle the candy melts onto each bite.
Notes